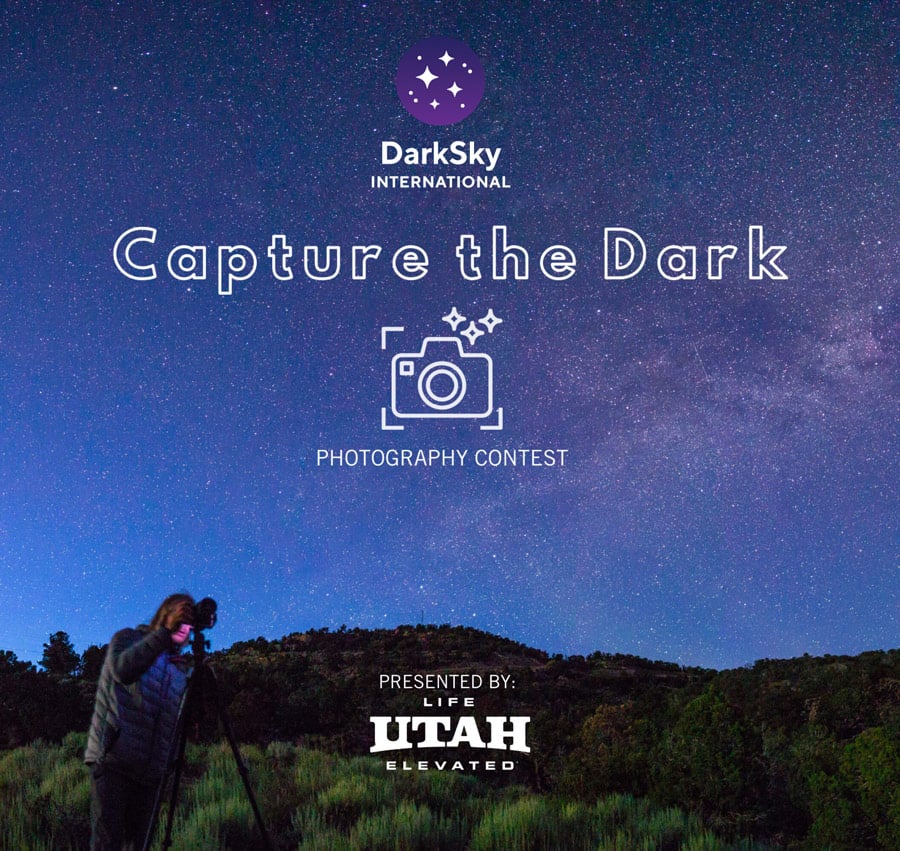


With our second annual Capture the Dark Photography Contest underway, we thought it was a good time to round up some talented astrophotographers from around the world to share some of their tips and tricks for capturing incredible images of the night sky and using them as a tool for dark sky advocacy. Meet them and check out their tips and tricks below!
www.adamgordon.photography/
@adammgordon
YouTube
Blog
My name is Adam Gordon, and I am a 19-year-old photographer based out of Henderson, Nevada. I began astrophotography five years ago when I became insanely interested in space. I got a telescope, bought a camera, and started taking pictures of the night sky. Ever since I have been obsessed with photographing the stars and the Milky Way. Over the years, I have been fortunate enough to travel to many different states and National Parks located in California, Arizona, Utah, and Nevada and continually improve upon my craft. I also recently attended the Nightscaper Conference in Kanab, Utah as the 1st place Youth Scholarship winner!
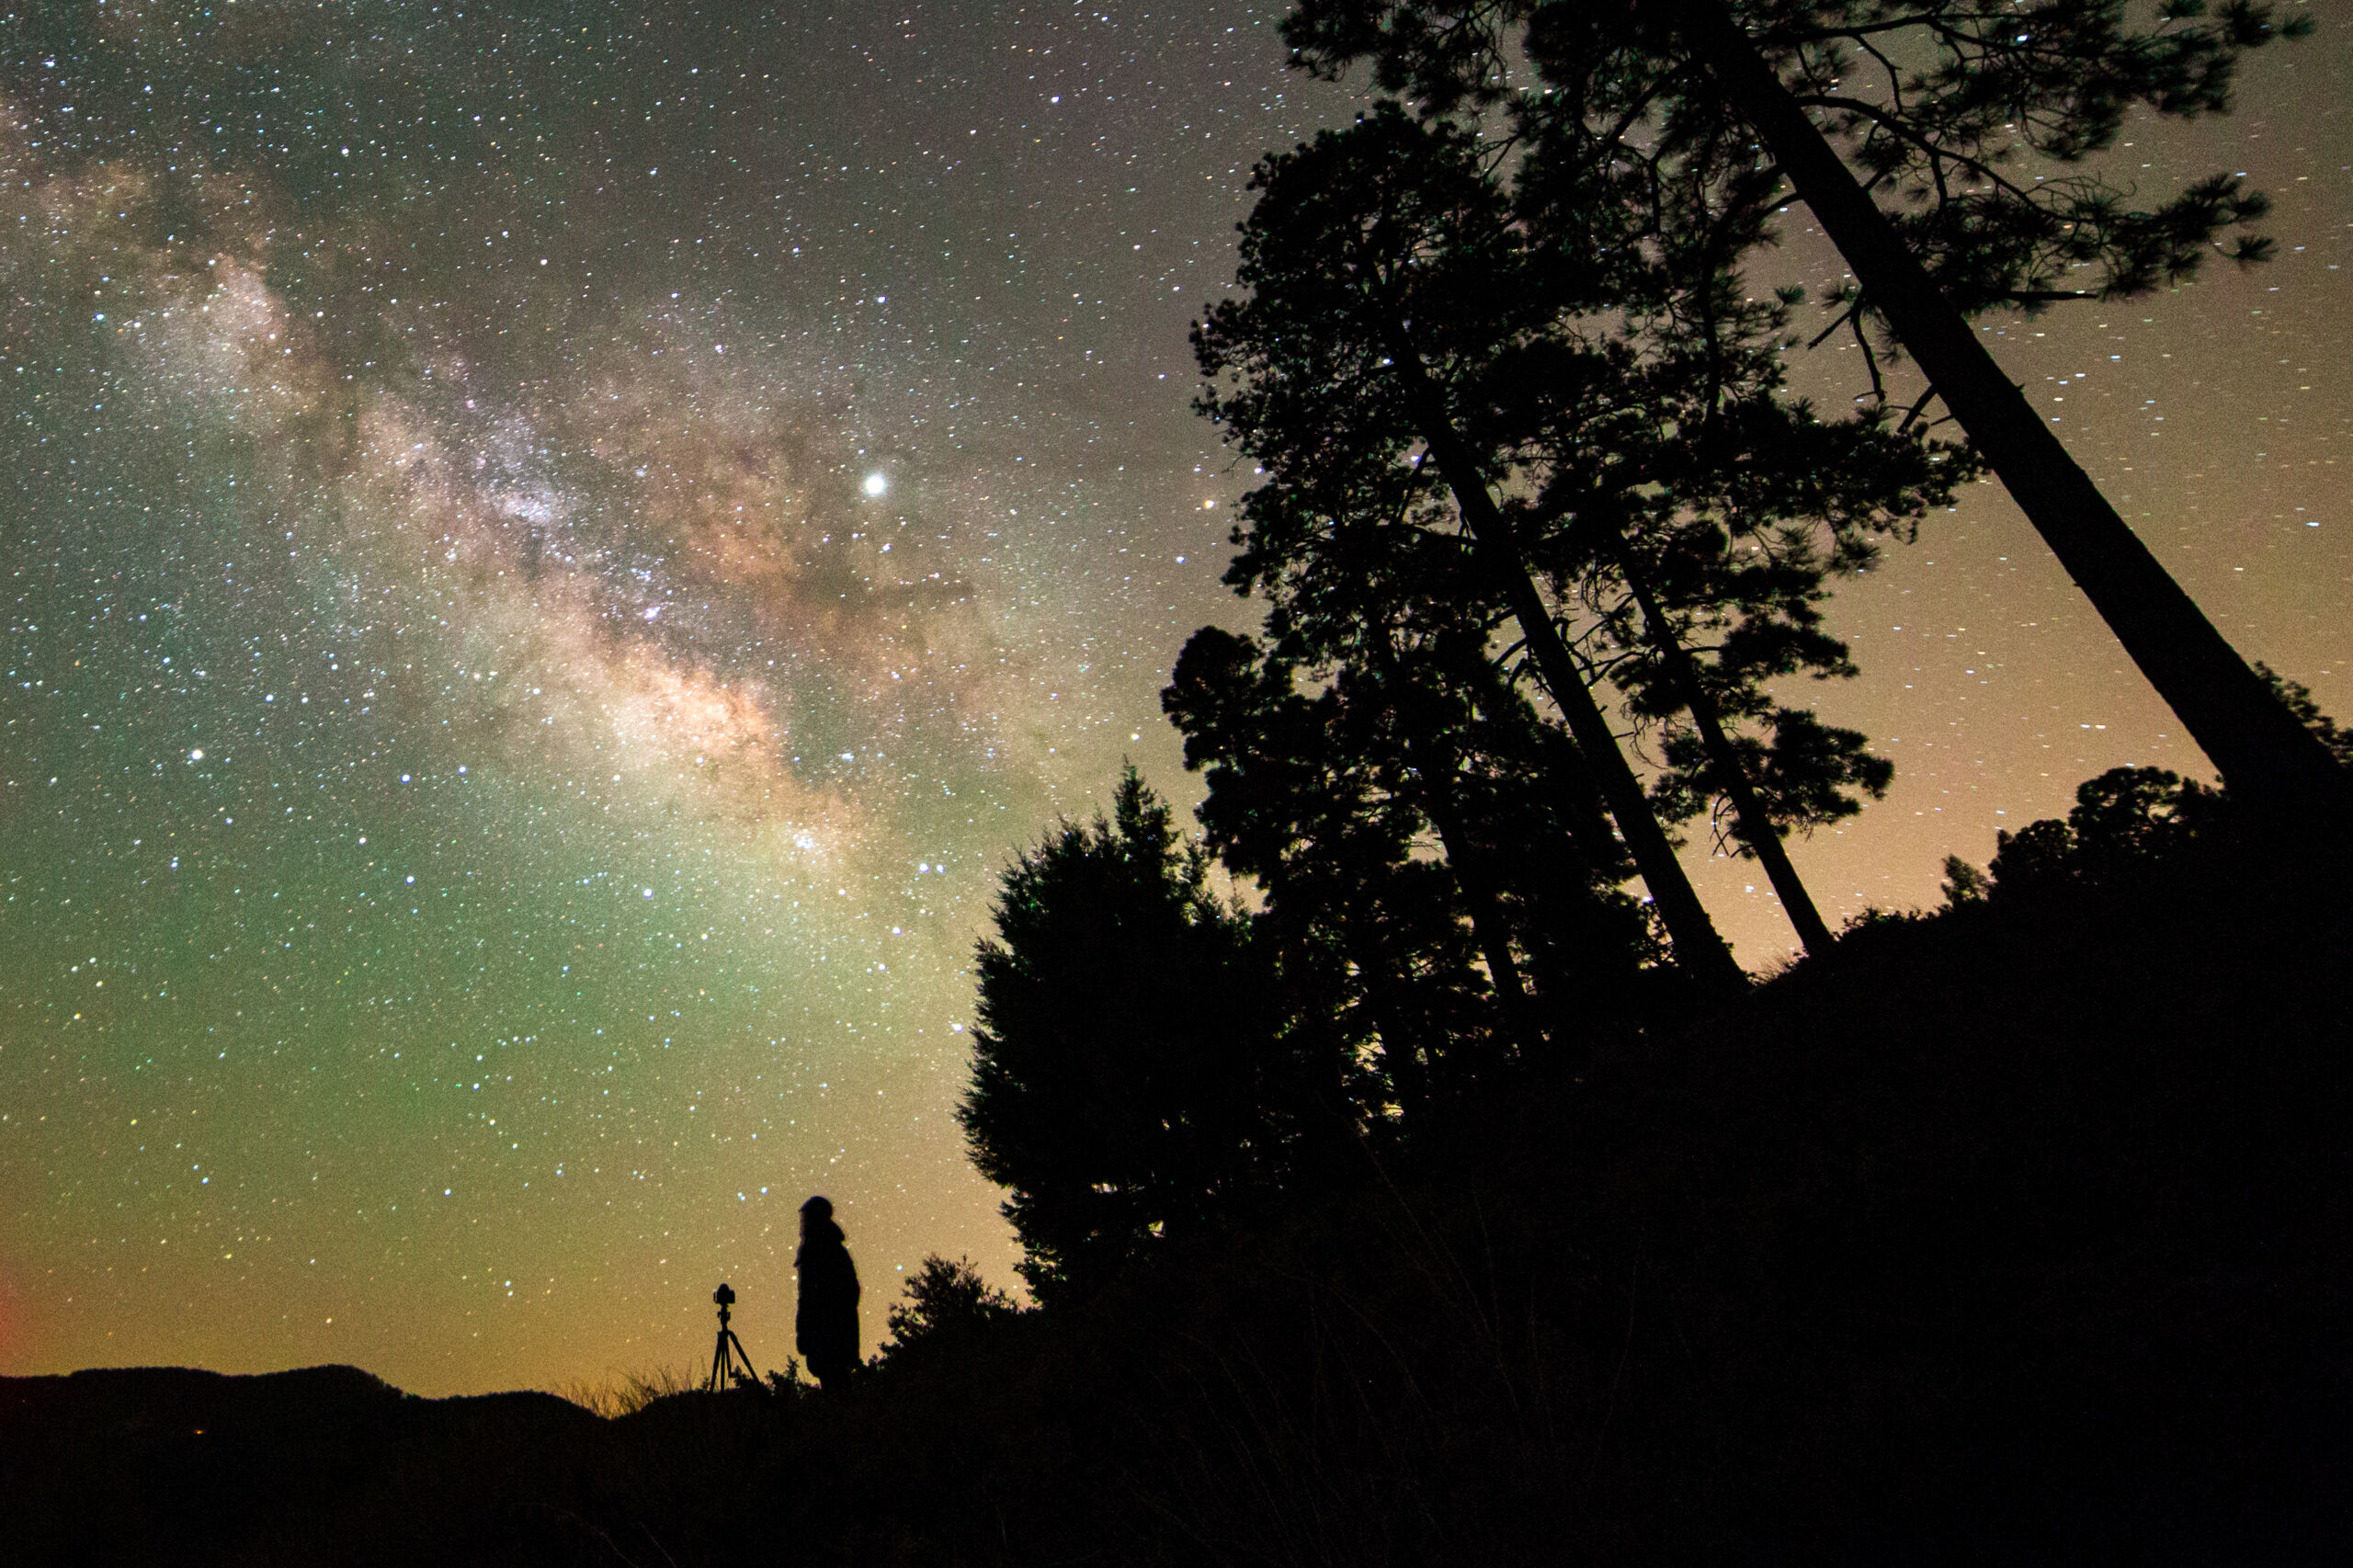
Here’s a quick tip for capturing awesome night selfies! The first step is the most obvious one, and that is to find a dark location. Preferably around a new moon so you can have hours and hours of nice dark skies! The next best tip is knowing how to position yourself (or your friend/family member) correctly to achieve the best shot. Personally, I love night silhouettes. They contrast exceptionally well with the night sky and can make for some pretty jaw-dropping images. You need to find a rock, hill, ledge, or really anything with a high vantage point. The idea is to position yourself so that your whole body is against the night sky. No mountains, no trees, just you. In the exposure, you will remain dark, and the sky will become a bit brighter. This difference will be enough for you to be seen in the picture easily.
This photo (above) was taken in Anza Borrego Desert State Park, California, and was shot in July 2017. I had scouted out this hill during the day and knew it would be a perfect location to get a nice silhouette of my friend with the Milky Way behind him. After taking some shots, I told him to stand still as I snapped away. I call this photo “Night Explorer” and love the sense of scale my friend provides as he points toward our galaxy and into a sea of stars.
@astrolina_photography
TWAN Profile
Jorgelina Alvarez was born in Las Flores, Argentina, a place filled with peace, nature, and tranquility. During her childhood, she explored the Universe that was around her, increasing her sense of curiosity. Her experience in exploration and her connection with astronomy is through photography. She also expresses herself through it. It’s a way to promote science and art at the same time. Jorgelina has been recognized by the media, such as Infobae (a digital newspaper), La Liga de la Ciencia (a TV show), La Nación (a newspaper), and journalists, like Jorge Lanata. Exhibiting individually and collectively in different exhibitions in Argentina, Latin America, and internationally. Jorgelina has received many mentions and awards for her photography work done in Antarctica. For several years, her profession was meteorology. Now, she is a full-time photographer, especially a landscape astrophotographer.
I look for is express what I see during the night in astrophotography. My look is my style because photographic techniques are the same for everyone, but composition and development differentiate us. My best advice is to love nature, enjoy it, feel it in your whole body and then take it in the best way to a photograph. The best “trick” is to know the terrain during the day, manage your camera memory, bring some chocolates (for the cold), and be in good company.
Hi, everyone! My name is Mikhaile Savary, aka @starboy32285, and I am a lawyer by day and aspiring astrophotographer by night. I have always had a deep interest in astronomy, but my astrophotography journey started in 2019 when my family moved from the light-polluted skies of Manhattan to the decidedly darker (and unpredictably cloudy) environs of Central New Jersey. What started with an eyepiece and an iPhone has blossomed into an eye-popping collection of gear that helps me collect photons from deep-sky objects from the comfort of my suburban backyard.
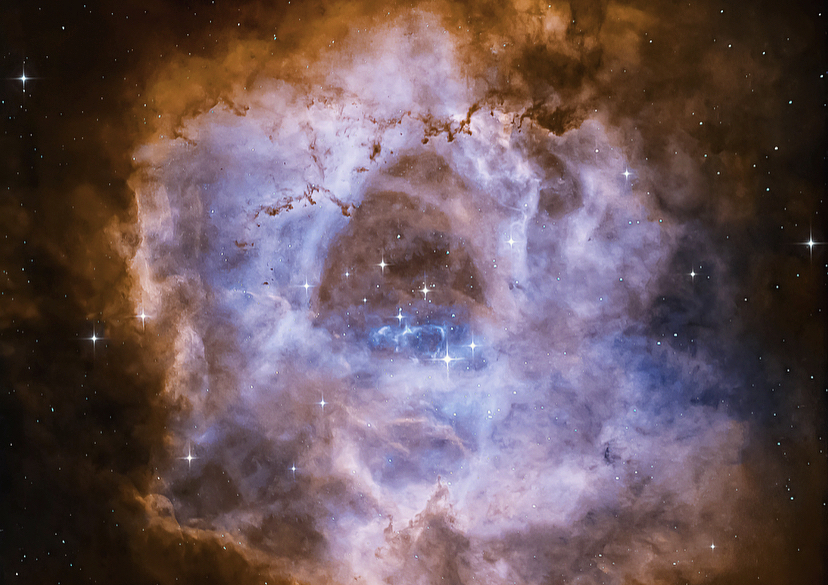
One thing I really love about the hobby is that it is reminiscent of when I was a kid, staring up at clouds and imagining what shapes they looked like. After all, nebulae are nothing more than deep-space clouds, albeit clouds that are incubating brand new stars. My childhood cloud-watching is a perspective I keep in mind every time I shoot, and it’s probably the driving force behind the editing topic I emphasize the most: star control. “More clouds, less stars” is probably the last thing you’d expect an astrophotographer to say, but when it comes to exposing nebulosity, this mantra has served me well. Stars are literally just pinpricks of light, which can easily bleed over many pixels as you stretch your image. They obscure the nebulae in your exposures and will become the star of your picture (pun intended) without careful control. One tip I’ve incorporated in my workflow is to remove stars before stretching/editing my target. There are several excellent tools and tutorials you can use to accomplish this, and it’s been transformative in allowing me to pull out faint nebulosity without blowing out the highlights from stars. This technique is displayed in this image of the Rosette Nebula (above) taken with my Celestron 130 SLT telescope and QHY 163m camera. I think it captures the essence of its namesake, with gaseous filaments billowing in the shape of a rose. I’m pretty sure the kid who enjoyed pointing out shapes in the clouds would love this shot. Thanks for reading, and here’s wishing everyone clear (and dark) skies!
www.pinceladasnocturnas.com
@pinceladasnocturnas
Facebook Page
Sergio is a recognized light pollution activist, multi-award-winning astrophotographer, that was born in Guatemala City. At a young age, he showed a great passion for astronomy. His life full of life-changing experiences, Sergio quit his job to move to Argentina and learned astronomy at La Plata University Astronomy Faculty. Here, he developed his skills as the official astrophotographer for the institution. Over the years, Sergio has collaborated with cultural, scientific, conservation, public, and private institutions around Latin America, including the European Space Agency. He focuses on documenting astronomy heritage and promoting sustainable activities, science, and dark sky conservation through events and art exhibitions. UNESCO Guatemala has recognized Sergio’s efforts. FORBES credited him as one of the most creative minds in the region. Sergio is currently a part of the Board of Directors of the International Dark-Sky Association and collaborates with the Ministry of Culture and Sports of Guatemala.
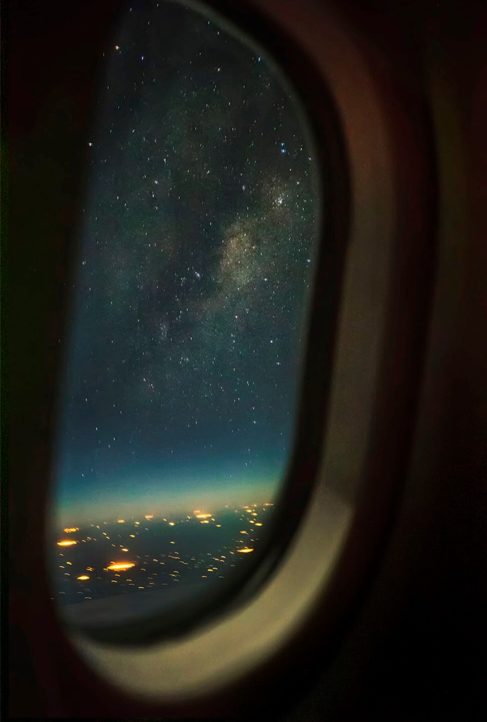
This was the message I shared when I uploaded this image to my Facebook page Milky Way Addicted, captured, and shared on February 28th, 2016.
After four years of planning and traveling around Guatemala and Argentina, I finally capture this single shot of the Milky Way from an airplane window with an Argentinian moonlighted landscape (above). I wanted to share this with the world immediately. I arrived home, found the best image of the sequence, processed it, and uploaded it.
Apparently, some colleagues had not seen a Milky Way shot from an airplane window with the landscape before, since many had doubts it was not fake, I only found this Astronomy Picture Of the Day published in 2014 during quick research. It shows the Milky Way from a plane but no landscape.
I received many supportive messages and other messages from angry people who pointed out that it was fake. After several debates in the photo’s comments and having shared the screenshots of my raws, the angry people finally calmed down.
Nowadays, the number of astrophotography’s taken from airplanes windows are more common. We find good tutorials on the web and, of course, better camera gears and improved capturing techniques.
Through my professional experience, I have learned that photography has the ability to change the world and how we perceive our reality. Every image you capture is important because it will inspire someone. That is the essence of art.
From this experience, I learned:
www.bettymayafoott.com
@bettymaya.foott
Facebook
Twitter
LinkedIn
Hi! My name is Bettymaya Foott, and I’ve been taking photos of the night sky for 6 years. My first photo of the Milky Way was taken as a part of a dark sky park application, and I’ve been hooked ever since. I am a member of The World at Night, and my day job is working as the Director of Engagement for the International Dark-Sky Association. I love to use astrophotography to communicate the awe and wonder of a naturally dark sky.
My biggest tip for astrophotographers is to utilize natural light to illuminate the foreground in their images. The two options I use for this are sunlight (blue hour) and moonlight. For images that communicate the importance of dark skies – it’s best to avoid using artificial light.
Don’t be scared of the Moon! I love the way that moonlight creates dramatic shadows and lights up vast landscapes in my nightscape images. When I first started shooting, I only shot during the New Moon. Once I started experimenting with utilizing moonlight in my shots, I was shocked at how much drama and detail it added! You’ll also be amazed at how much milky way you can capture even when the moon is up.
My other favorite way to use natural light to illuminate my foregrounds is to capture the stars in a single exposure during the ‘blue hour.’ This is when the sun has set enough to reveal the beautiful stars and milky way but is still up enough to diffuse its light through the atmosphere, creating a blue sky and soft foreground light. This happens when the sun is 4-6 degrees below the horizon. It happens fast, so be ready! I usually shoot around when I can see all the stars in Scorpius after sunset. Just set up your shot and be ready!
My passion for photography started from a very young age, but it was thanks to my first cell phone that I started taking photos. I love climbing volcanoes, and one night in November 2016, I saw the moon aligned with Venus and the volcano of fire. From that night, my love for astrophotography began. My dedication and effort have led me to fulfill some of my dreams. I collaborate for National Geographic Latinoamérica, BBC Latinoamérica, among others. But the most important thing is that thanks to the privilege that we have in life has motivated me to share that beautiful message of conscience to save the beauty that we still have.


Do you have an astrophotography tip you’d like to share? Post it on social media and tag us with @idadarksky and #idadarksky.
To learn more about the 2021 Capture the Dark Photography Contest and submit a photo, go here.
Meet the Judges of the 2021 Capture the Dark Photography Contest here.